CMPS03 - Robot Compass Module
This compass module has been specifically designed for use in robots as an aid to navigation. The aim was to produce a unique number to represent the direction the robot is facing. The compass uses the Philips KMZ51 magnetic field sensor, which is sensitive enough to detect the Earths magnetic field. The output from two of them mounted at right angles to each other is used to compute the direction of the horizontal component of the Earths magnetic field. We have examples of using the Compass module with a wide range of popular controllers.
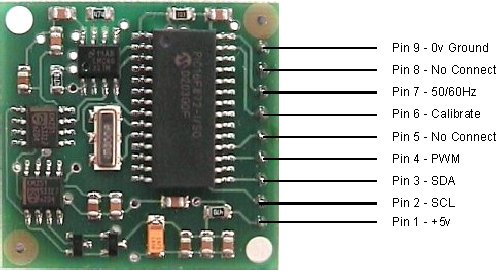
Connections to the compass module

The compass module requires a 5v power supply at a nominal 15mA.
There are
two ways of getting the bearing from the module. A PWM signal is available on
pin 4, or an I2C interface is provided on pins 2,3.
The PWM signal is a pulse width modulated signal with the positive width of the pulse representing the angle. The pulse width varies from 1mS (0° ) to 36.99mS (359.9° ) – in other words 100uS/° with a +1mS offset. The signal goes low for 65mS between pulses, so the cycle time is 65mS + the pulse width - ie. 66ms-102ms. The pulse is generated by a 16 bit timer in the processor giving a 1uS resolution, however I would not recommend measuring this to anything better than 0.1° (10uS). Make sure you connect the I2C pins, SCL and SDA, to the 5v supply if you are using the PWM, as there are no pull-up resistors on these pins.
Pin 2,3 are an I2C interface and can be used to get a direct readout of the bearing. If the I2C interface is not used then these pins should be pulled high (to +5v) via a couple of resistors. Around 47k is ok, the values are not at all critical.

I2C communication protocol with the compass module is the same as popular eeprom's such as the 24C04.. First send a start bit, the module address (0XC0) with the read/write bit low, then the register number you wish to read. This is followed by a repeated start and the module address again with the read/write bit high (0XC1). You now read one or two bytes for 8bit or 16bit registers respectively. 16bit registers are read high byte first. The compass has a 16 byte array of registers, some of which double up as 16 bit registers as follows;
| Register | Function |
| 0 | Software Revision Number |
| 1 | Compass Bearing as a byte, i.e. 0-255 for a full circle |
| 2,3 | Compass Bearing as a word, i.e. 0-3599 for a full circle, representing 0-359.9 degrees. |
| 4,5 | Internal Test - Sensor1 difference signal - 16 bit signed word |
| 6,7 | Internal Test - Sensor2 difference signal - 16 bit signed word |
| 8,9 | Internal Test - Calibration value 1 - 16 bit signed word |
| 10,11 | Internal Test - Calibration value 2 - 16 bit signed word |
| 12 | Unused - Read as Zero |
| 13 | Unused - Read as Zero |
| 14 | Unused - Read as Undefined |
| 15 | Calibrate Command - Write 255 to perform calibration step. See text. |
Register 0 is the Software revision number (8 at the time of writing). Register 1 is the bearing converted to a 0-255 value. This may be easier for some applications than 0-360 which requires two bytes. For those who require better resolution registers 2 and 3 (high byte first) are a 16 bit unsigned integer in the range 0-3599. This represents 0-359.9°. Registers 4 to 11 are internal test registers and 12,13 are unused. Register 14 is undefined. Don't read them if you don't want them - you'll just waste your I2C bandwidth. Register 15 is used to calibrate the compass. Full calibration information is here.
The I2C interface does not have any pull-up resistors on the board, these should be provided elsewhere,
most probably with the bus master. They are required on both the SCL and SDA
lines, but only once for the whole bus, not on each module. I suggest a value
of 1k8 if you are going to be working up to 400KHz and 1k2 or even 1k if you
are going up to 1MHz. The compass is designed to work at up to the standard
clock speed (SCL) of 100KHz, however the clock speed can be raised to 1MHZ
providing the following precaution is taken;
At speeds above around 160KHz the CPU cannot respond fast enough to read the I2C
data. Therefore a small delay of 50uS should be inserted either side of writing
the register address. No delays are required anywhere else in the sequence. By
doing this, I have tested the compass module up to 1.3MHz SCL clock speed. There
is an example driver here using the HITECH PICC
compiler for the PIC16F877. Note
that the above is of no concern if you are using popular embedded language
processors such as the OOPic. The compass
module always operates as a slave, its never a bus master.
Pin 7 is an input pin selecting either 50Hz (low) or 60Hz (high) operation. I added this option after noticing a jitter of around 1.5° in the output. The cause was the 50Hz mains field in my workshop. By converting in synchronism with the mains frequency this was reduced to around 0.2° . An internal conversion is done every 40mS (50Hz) or every 33.3mS (60Hz). The pin has an on-board pull-up can be left unconnected for 60Hz operation. There is no synchronism between the PWM or I2C outputs and the conversion. They both retrieve the most recent internal reading, which is continuously converted, whether it is used or not.
Pin 6 is used to calibrate the compass. The calibrate input (pin 6) has an on-board pull-up resistor and can be left unconnected after calibration. Calibration is identical to the CMPS01 Rev7 procedure. Full calibration information is here.
Pins 5 and 8 are No Connect. Actually pin 8 is the processor reset line and has an on-board pull-up resistor. It is there so that we can program the processor chip after placement on the PCB.
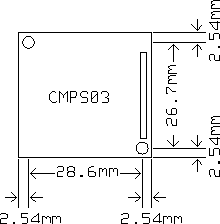
PCB Drilling Plan
The following diagram shows the CMPS03 PCB mounting hole positions.

We have examples of using the Compass module with a wide range of popular controllers. (Photos show the CMPS01) .
I have prepared a short Q&A. If you have any questions of your own,
please email me.
Gerald Coe.